• Skip to primary navigation
  • Skip to main content
  • Skip to primary sidebar

Lynsey Kmetz logo

  • Home
  • About
    • Work With Me
    • PR Friendly
    • Privacy Policy
  • All Recipes
  • Keto Recipes
  • Fitness
  • Travel

Aside

Whole30 Halloween Stuffed Bell Peppers

By Moscato Mom 7 Comments

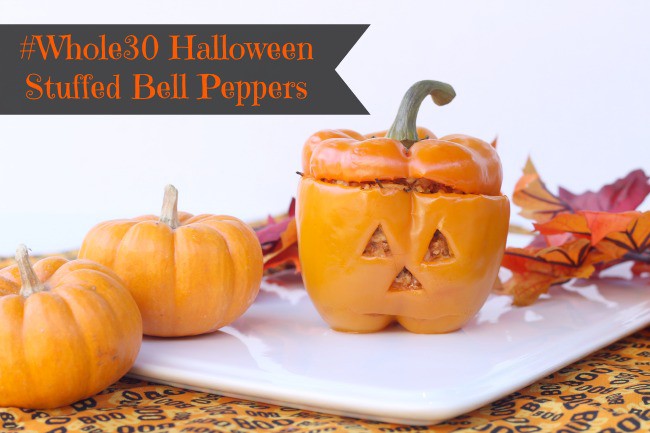
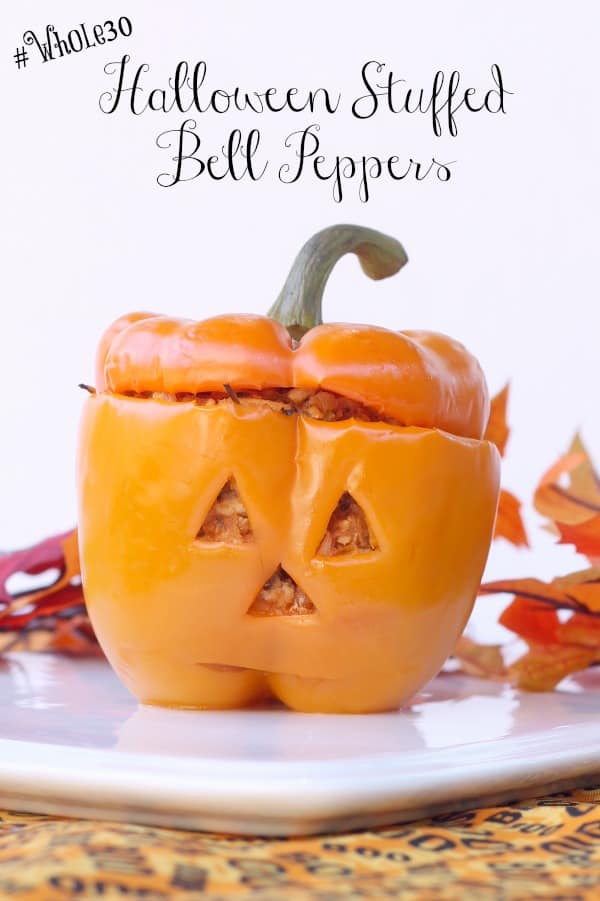
With Halloween just around the corner, I had an idea of a "treat" everyone would enjoy that would still keep us in line with our health goals. Halloween Stuffed Bell Peppers are perfect! 

A traditional stuffed bell pepper recipe is made with rice - which is full of carbs! I wanted to clean things up so I made a few tweaks and I have to say - these have even more flavor! 

Wanting to make it fun for the kids too, I made a couple little cuts... and the result was adorable. 

This post may contain affiliate links which means we receive a small commission at
no cost to you when you make a purchase. As an Amazon Associate, I may earn from
qualifying purchases. As an employee of Apogee, any affiliate links from our clients are at 0% commission and two-tiered referrals are at $0.

How To Reheat Stuffed Bell Peppers

Stuffed bell peppers are a great dish to make ahead of time - because they reheat so easily!

To reheat, simply place in a shallow baking dish with a bit of water at the bottom. 

Loosen stuffing a bit and place in a preheated oven for about 10 minutes! Voila! 

Whole30 Stuffed Bell Peppers

Ingredients

  • 1 pound ground turkey breast
  • 1 large head of cauliflower , cut into pieces
  • 4 large orange bell peppers
  • 1 can whole30 complaint tomato sauce
  • 1 large yellow onion , minced
  • 1 large green bell pepper , minced
  • 2 teaspoons minced garlic
  • 1/4 cup chicken broth
  • 2 tablespoons parsley
  • 2 tablespoons basil
  • 1 tablespoon garlic salt
  • 4 tablespoons olive oil

How To Make Stuffed Bell Peppers

  1. The first step is to turn your cauliflower into “rice.” Grate pieces of raw cauliflower in a food processor.
  2. In a skillet, heat olive oil and garlic salt. Add in cauliflower “rice” and cook 5-7 minutes, stirring often to prevent sticking.
  3. Cauliflower will be soft and begin to brown. Turn off the heat and set aside. Turn your oven on to preheat 350*.
  4. In another skillet, brown your turkey completely until all pink is gone. Add in minced onion, minced green bell pepper, minced garlic, parsley, and basil.
  5. Add in chicken broth and let cook down – about 7-10 minutes.
  6. Add in tomato sauce and cauliflower “rice” and let simmer until most of the liquid is gone, stirring often.
  7. While the meat mixture cooks down, cut the tops off of the four orange bell peppers and gently remove the seeds from the inside. With a small paring knife, carefully cut out the eyes, nose, and mouth of the jack-o-lantern.
  8. Fill each bell pepper with the meat mixture and replace the top.
  9. Gently place into the corner of a deep pyrex dish with the jack-o-lantern facing out.
  10. Make sure they are standing upright and gently place on the middle rack of the oven. Bake for 20 minutes or until bell pepper is softening.
  11. Let cool and serve with your favorite sides. Enjoy!

When the family came to the dinner table they all loved their little individual "jack-o-lanterns" and gobbled up every bite.

It wasn't until after they finished that I told them they were 100% Whole30 Compliant. How's that for a "trick!?"

whole30 stuffed bell pepper recipe
Whole30 Halloween Stuffed Bell Peppers

Whole30 Halloween Stuffed Bell Peppers

Yield: 6
Prep Time: 20 minutes
Cook Time: 20 minutes
Total Time: 40 minutes

These festive Whole30 Stuffed Bell Peppers are low in carbs and big on taste! Suer fun for Halloween!

Ingredients

  • 1 pound ground turkey breast
  • 1 large head of cauliflower, , cut into pieces
  • 6 large orange bell peppers
  • 1 can whole30 complaint tomato sauce
  • 1 large yellow onion, , minced
  • 1 large green bell pepper, , minced
  • 2 teaspoons minced garlic
  • 1/4 cup chicken broth
  • 2 tablespoons parsley
  • 2 tablespoons basil
  • 1 tablespoon garlic salt
  • 4 tablespoons olive oil

Instructions

  1. The first step is to turn your cauliflower into “rice.” Grate pieces of raw cauliflower in a food processor.
  2. In a skillet, heat olive oil and garlic salt. Add in cauliflower “rice” and cook 5-7 minutes, stirring often to prevent sticking.
  3. Cauliflower will be soft and begin to brown. Turn off the heat and set aside. Turn your oven on to preheat 350*.
  4. In another skillet, brown your turkey completely until all pink is gone. Add in minced onion, minced green bell pepper, minced garlic, parsley, and basil.
  5. Add in chicken broth and let cook down – about 7-10 minutes.
  6. Add in tomato sauce and cauliflower “rice” and let simmer until most of the liquid is gone, stirring often.
  7. While the meat mixture cooks down, cut the tops off of the four orange bell peppers and gently remove the seeds from the inside. With a small paring knife, carefully cut out the eyes, nose, and mouth of the jack-o-lantern.
  8. Fill each bell pepper with the meat mixture and replace the top.
  9. Gently place into the corner of a deep pyrex dish with the jack-o-lantern facing out.
  10. Make sure they are standing upright and gently place on the middle rack of the oven. Bake for 20 minutes or until bell pepper is softening.
  11. Let cool and serve with your favorite sides. Enjoy!
Nutrition Information
Yield 6 Serving Size 1
Amount Per Serving Calories 361Total Fat 12gSaturated Fat 2gTrans Fat 0gUnsaturated Fat 9gCholesterol 54mgSodium 1291mgCarbohydrates 39gFiber 9gSugar 24gProtein 30g

Did you make this recipe?

I would love to see! Tag me on Instagram @lynsey.kmetz or use the buttons below to share it on Pinterest! Thanks for your support!

© Moscato Mom
Cuisine: American / Category: Main Dishes

Toasted Marshmallow Chocolate Milkshake - With Peeps Minis!

By Moscato Mom 19 Comments

Every Easter Mike and the girls stock up on what they think will be a years worth of Peeps... only to run out a few weeks later and pout until Easter rolled around again. Until now Easter was really the only time you could find these delicious little goodies which are gluten free and fat free. So I was super excited when I got to tell them that their favorite little Easter snack is now available year round!

This post may contain affiliate links which means we receive a small commission at
no cost to you when you make a purchase. As an Amazon Associate, I may earn from
qualifying purchases. As an employee of Apogee, any affiliate links from our clients are at 0% commission and two-tiered referrals are at $0.

New Peeps Minis are hitting store shelves everywhere and come in three delicious flavors - strawberry creme, sour watermelon, and chocolate creme! Each Peeps Minis Chick is only 14 calories - so even I have been indulging since they arrived. We've even started concocting new recipes with them like our new favorite - Toasted Marshmallow Chocolate Milkshakes.

peeps toasted marshmallow milkshake

This milkshake is delicious - and has more flavor than just your typical chocolate shake. And how cute is that tiny little Peep hanging out on the side?!

Toasted Marshmallow Chocolate Milkshake – With Peeps Minis!

Toasted Marshmallow Chocolate Milkshake – With Peeps Minis!

Yield: 4
Prep Time: 10 minutes
Total Time: 10 minutes

This milkshake is delicious - and has more flavor than just your typical chocolate shake. And how cute is that tiny little Peep hanging out on the side?!

Ingredients

  • 1 bag Chocolate Creme Peeps Minis
  • 2 cups of milk
  • 2 Tbsp plain yogurt
  • 2 Tbsp cocoa powder
  • 2 cups vanilla ice cream
  • Rediwhip Whipped Cream

Instructions

  1. Preheat oven to 350*.
  2. On a medium-size cookie sheet, place all but one Peeps Minis Chicks in a row. Place under your burner in the oven for 2 to 3 minutes, until they begin to melt and char on top. Take out of oven and let cool.
  3. Repeat this step but only let the marshmallows toast, so they are slightly burnt. Take out of oven and let cool.
  4. In a blender, pour milk, sour cream, cocoa powder, ice cream and charred marshmallows.
  5. Mix for 5 minutes.
  6. Pour in a large glass and top with Rediwhip and one Peeps Mini Chick. Serve immediately.
Nutrition Information
Yield 4 Serving Size 1
Amount Per Serving Calories 234Total Fat 11gSaturated Fat 7gTrans Fat 0gUnsaturated Fat 3gCholesterol 41mgSodium 125mgCarbohydrates 27gFiber 1gSugar 17gProtein 8g

Did you make this recipe?

I would love to see! Tag me on Instagram @lynsey.kmetz or use the buttons below to share it on Pinterest! Thanks for your support!

© Moscato Mom
Cuisine: American / Category: Beverages

The girls absolutely love these and I love that they are quick and easy. I can even use the toaster oven and Magic Bullet to make prep even faster.  The Peeps Minis give it an extra special flavor over just your regular, boring chocolate milkshake.  And parents... you can throw some Bailey's Irish Creme in there to make it a delicious dessert cocktail for you! Just sayin. We've even made it using the strawberry creme Peeps Minis for a chocolate-covered-strawberry flavored milkshake. Delicious.

You can pick up new Peeps Minis at your local grocer and make your own Peeps concoctions year round!

peeps

Are you a Peeps fan?

lynseysig

Chewy M&M Cookies Recipe

By Moscato Mom 20 Comments

These Chewy M&M Cookies are some of the best cookies you will ever have! Soft and delicious - they are everything a Christmas Cookie should be!

chewy m&m cookies

This post may contain affiliate links which means we receive a small commission at
no cost to you when you make a purchase. As an Amazon Associate, I may earn from
qualifying purchases. As an employee of Apogee, any affiliate links from our clients are at 0% commission and two-tiered referrals are at $0.

I am not a huge cookie fan generally, but these I can not seem to keep away from. They are the perfect cookie for your Christmas Cookie Exchange.

They are so easy to make, Chewy M&M Cookies are delightfully soft and chewy - just the way we like them. 

Chewy M&M Cookies Recipe

Ingredients

  • 1 cup packed brown sugar
  • 2/3 cup white sugar
  • 1 cup butter melted
  • 2 eggs
  • 2 teaspoons vanilla extract
  • 2 1/2 cups all purpose flour
  • 1 teaspoon salt
  • 1 teaspoon baking powder
  • 2 cups M&Ms – I used the Minis!

Instructions

Mix together sugar, butter, vanilla, and eggs and mix thoroughly.

Add in salt and baking soda.

Then gradually add in flour, mixing constantly.

Once it is well blended, add in your M&Ms and mix gently – if you mix too much the colors will start to run.

cookie dough with m&m candies

Spoon mixture out onto a greased cookie sheet and bake 8-10 minutes until the bottoms start to brown.

Cookies will still feel soft to the touch – you want them done but not overcooked.

Once done, gently remove from cookie sheet and let cool on a baking rack.

M&M cookies recipe

These were such a huge hit at the Church Bonfire that I was asked to make them for every event from here on out. 

The good news is that they were easy enough that I happily said I would. The girls enjoyed getting to help make them and from start to finish was less than an hour. Can't beat that!

Want more M&M Cookie Recipes?  Check out the Chewy Strawberry M&M Valentine's Day Cookies!

Chewy M&M Cookies Recipe

Chewy M&M Cookies Recipe

Yield: 24
Prep Time: 10 minutes
Cook Time: 10 minutes
Total Time: 20 minutes

This Chewy M&M Cookies Recipe will become your all-time favorite cookie recipe! Super soft and delicious - perfect for holiday cookie exchanges!

Ingredients

  • 1 cup packed brown sugar
  • 2/3 cup white sugar
  • 1 cup butter, melted
  • 2 eggs
  • 2 teaspoons vanilla extract
  • 2 1/2 cups all purpose flour
  • 1 teaspoon salt
  • 1 teaspoon baking powder
  • 2 cups mini M&Ms

Instructions

  1. Mix together sugar, butter, vanilla, and eggs and mix thoroughly.
  2. Add in salt and baking soda.
  3. Then gradually add in flour, mixing constantly.
  4. Once it is well blended, add in your M&Ms and mix gently - if you mix too much the colors will start to run.
  5. Spoon mixture out onto a greased cookie sheet and bake 8-10 minutes until the bottoms start to brown.
  6. Cookies will still feel soft to the touch - you want them done but not overcooked.
  7. Once done, gently remove from cookie sheet and let cool on a baking rack.
Nutrition Information
Yield 24 Serving Size 1
Amount Per Serving Calories 258Total Fat 12gSaturated Fat 7gTrans Fat 0gUnsaturated Fat 4gCholesterol 38mgSodium 188mgCarbohydrates 35gFiber 1gSugar 24gProtein 3g

Did you make this recipe?

I would love to see! Tag me on Instagram @lynsey.kmetz or use the buttons below to share it on Pinterest! Thanks for your support!

© Moscato Mom
Cuisine: American / Category: Desserts
chewy cookies

Carrot and Cauliflower Herb Mash

By Moscato Mom 12 Comments

This Carrot and Cauliflower Herb Mash is the perfect Whole30 Side Dish for all of your holiday meals!

whole30 holiday side dish

This post may contain affiliate links which means we receive a small commission at
no cost to you when you make a purchase. As an Amazon Associate, I may earn from
qualifying purchases. As an employee of Apogee, any affiliate links from our clients are at 0% commission and two-tiered referrals are at $0.

Since beginning Whole30 back in July, my entire life has changed. Yep, I realize how totally cliche that sounds and I am perfectly ok with it - because it is true.

My Whole30 Experience was incredible, and since then I have maintained the lifestyle about 90% - splurging on my last two press trips but staying compliant at home. However with the holidays coming up, I know it is going to be easier and easier to let myself slide if I do not have a plan.

So I began this week testing out some "Whole30 Holiday" type food so that when the big day comes, I know I will be serving my family something super tasty - and super healthy.

This week I tried out a Carrot and Cauliflower Mash that was absolutely amazing. The recipe was not only delicious - it was quick and easy to make.

The recipe said it served four, but all four of us were wishing for more. It had a sweet and savory taste at the same time - pairing perfectly with chicken, but will also be amazing alongside ham or turkey.

Healthy Thanksgiving Side Dish – Carrot and Cauliflower Herb Mash

Healthy Thanksgiving Side Dish – Carrot and Cauliflower Herb Mash

Yield: 6
Prep Time: 20 minutes
Cook Time: 20 minutes
Total Time: 40 minutes

This Carrot and Cauliflower Herb Mash is the perfect Whole30 Side Dish for all of your holiday meals!

Ingredients

  • one head of cauliflower, steamed or boiled until soft
  • 2 cups of carrots , steamed or boiled until soft
  • 1 medium sized yellow onion, diced
  • 1 teaspoon of minced garlic
  • 1 tablespoon rosemary
  • 1 tablespoon thyme
  • 1/4 cup olive oil, divided

Instructions

  1. In a large skillet, put half of olive oil, diced onion and seasonings and sauté slowly until onion is translucent.
  2. Pour onion mixture in to large food processor.
  3. Add in carrots and cauliflower, and process until smooth – slowly drizzling in remaining olive oil.
  4. Serve with your favorite Whole30 meat. Voila!
Nutrition Information
Yield 6 Serving Size 1
Amount Per Serving Calories 129Total Fat 10gSaturated Fat 1gTrans Fat 0gUnsaturated Fat 8gCholesterol 0mgSodium 45mgCarbohydrates 10gFiber 4gSugar 4gProtein 2g

Did you make this recipe?

I would love to see! Tag me on Instagram @lynsey.kmetz or use the buttons below to share it on Pinterest! Thanks for your support!

© Moscato Mom
Cuisine: American / Category: Side Dishes
Healthy Thanksgiving Side Dish – Carrot and Cauliflower Herb Mash

Healthy Thanksgiving Side Dish – Carrot and Cauliflower Herb Mash

Yield: 6
Prep Time: 20 minutes
Cook Time: 20 minutes
Total Time: 40 minutes

This Carrot and Cauliflower Herb Mash is the perfect Whole30 Side Dish for all of your holiday meals!

Ingredients

  • one head of cauliflower, steamed or boiled until soft
  • 2 cups of carrots , steamed or boiled until soft
  • 1 medium sized yellow onion, diced
  • 1 teaspoon of minced garlic
  • 1 tablespoon rosemary
  • 1 tablespoon thyme
  • 1/4 cup olive oil, divided

Instructions

  1. In a large skillet, put half of olive oil, diced onion and seasonings and sauté slowly until onion is translucent.
  2. Pour onion mixture in to large food processor.
  3. Add in carrots and cauliflower, and process until smooth – slowly drizzling in remaining olive oil.
  4. Serve with your favorite Whole30 meat. Voila!
Nutrition Information
Yield 6 Serving Size 1
Amount Per Serving Calories 129Total Fat 10gSaturated Fat 1gTrans Fat 0gUnsaturated Fat 8gCholesterol 0mgSodium 45mgCarbohydrates 10gFiber 4gSugar 4gProtein 2g

Did you make this recipe?

I would love to see! Tag me on Instagram @lynsey.kmetz or use the buttons below to share it on Pinterest! Thanks for your support!

© Moscato Mom
Cuisine: American / Category: Side Dishes

I can not wait to serve this Whole30 side dish next to my big Thanksgiving Turkey. I will be doubling - if not tripling the recipe - we loved it that much.  Plus I love that it was simple and only took a few minutes to make. The girls have already asked when we can have it again. Talk about a huge win!

Do you cook healthy for the holidays?

Healthy Halloween Chicken Pot Pie Recipe

By Moscato Mom 45 Comments

Make this Jack-O-Lantern Healthy Chicken Pot Pie Recipe for a fun and festive Halloween dinner!

This post may contain affiliate links which means we receive a small commission at
no cost to you when you make a purchase. As an Amazon Associate, I may earn from
qualifying purchases. As an employee of Apogee, any affiliate links from our clients are at 0% commission and two-tiered referrals are at $0.

I love Fall.  It is my absolute favorite time of year.  Though I don't like COLD weather, I do like nice crisp mornings and snuggling up with Mike in front of the fire in the evenings... following an amazingly tasty meal.  This year I am already preparing for the holidays by making recipes that are as healthy as they are delicious - and even sometimes making myself a completely different meal than my family... after all, *I* am on this diet, not them.

Tonight I made my very first ever Chicken Pot Pie - a "healthy-ish" version for me, and a "normal" version for them.  To be honest... I could not tell the difference between the two.  Both of them were delicious and I am excited to have a new, simple meal to add to my repertoire.

Healthy Halloween Chicken Pot Pie Recipe

Healthy Halloween Chicken Pot Pie Recipe

Yield: 1
Prep Time: 10 minutes
Cook Time: 30 minutes
Total Time: 40 minutes

This Healthy Chicken Pot Pie is delicious any time of year - but it is especially perfect for Halloween!

Ingredients

  • 1 1/2 c 2% milk
  • 1 medium onion, , chopped
  • 2 rotisserie chicken breasts – cubed
  • 3 tbsp flour
  • 1 tsp poultry seasoning
  • 1/2 tsp pepper
  • 1 98 % fat free can cream of chicken soup
  • assorted canned vegetables – corn, , lima beans, green beans, carrots, etc
  • 2 pie crusts

Instructions

  1. In a medium sauce pan, mix milk, pepper, flour, and poultry seasoning together over medium heat.
  2. Stir in chopped onion and cook about 4 minutes or until sauce is thickening and onions are soft.
  3. Add cream of chicken soup and mix well.
  4. Slowly add in cooked chicken and vegetables and mix well, lowering heat to low.
  5. Spoon mixture into empty pie crust. Gently lay second pie crust over top and using a sharp knife, cut out eyes, nose, and mouth and discard cutouts. Use extra dough to make a “stem” if desired.
  6. Bake 30-35 minutes or until edges are bubbly and crust is browned.
  7. Serve hot.
Nutrition Information
Yield 8 Serving Size 1
Amount Per Serving Calories 456Total Fat 21gSaturated Fat 6gTrans Fat 0gUnsaturated Fat 12gCholesterol 78mgSodium 737mgCarbohydrates 40gFiber 4gSugar 7gProtein 29g

Did you make this recipe?

I would love to see! Tag me on Instagram @lynsey.kmetz or use the buttons below to share it on Pinterest! Thanks for your support!

© Moscato Mom
Cuisine: American / Category: Main Dishes

My Dad came over tonight and the five of us absolutely LOVED these pies.  I do not know that I have ever eaten a chicken pot pie before, but after tasting this one, I know this will be something we make often during the cool nights of Fall and Winter.  I wonder if I can cut a turkey into the top crust... hmmm...

Chocolate Kiss Valentine's Day Cookies

By Moscato Mom 45 Comments

These Double Chocolate Kiss Cookies are your go to Valentine's Day Cookie Recipe! So easy to make and so chocolatey everyone will love them!

Chocolate Kiss Valentine's Day Cookies

This post may contain affiliate links which means we receive a small commission at
no cost to you when you make a purchase. As an Amazon Associate, I may earn from
qualifying purchases. As an employee of Apogee, any affiliate links from our clients are at 0% commission and two-tiered referrals are at $0.

My favorite holiday by far is Valentine's Day. Even when I was single, I still loved the whole idea of a holiday that celebrates love. Maybe it is because I am a hopeless romantic - but I just think there ought to be more love in this world!

Valentine's Day Cookies

I also love baking and crafting for Valentine's Day, and one of my favorites is my Chocolate Kiss Valentine's Day Cookies. And yes, they taste as good as they look ... especially warm!

The ooey gooeyness of the Hershey's Kiss with the crunch of the sprinkles... total chocolate perfection.

These cookies are super fun to make and they are so easy even your kids can get involved! You can give each cookie a different look simply by changing up the sprinkles! 

Valentine's Day Cookies
Chocolate Kiss Valentine’s Day Cookies

Chocolate Kiss Valentine’s Day Cookies

Yield: 12
Cook Time: 12 minutes
Additional Time: 1 hour 20 minutes
Total Time: 1 hour 32 minutes

These Double Chocolate Kiss Cookies are your go to Valentine's Day Cookie Recipe! So easy to make and so chocolatey everyone will love them!

Ingredients

  • 1 c all purpose flour
  • 1/3 c cocoa powder
  • 1/4 tsp salt
  • 1 stick unsalted butter, , softened
  • 2/3 c sugar
  • 1 egg yolk
  • 2 tsp milk
  • 1 tsp vanilla extract
  • 1 c Valentine’s sprinkles
  • Hershey Kisses, , unwrapped

Instructions

  1. In a bowl, combine flour, cocoa, and salt and set aside.
  2. In your mixer beat butter and sugar until light and fluffy – about two minutes. Add egg yolk, milk, and vanilla and mix well.
  3. Slowly add in flour mixture until combined.
  4. Cover and refrigerate dough until firm – at least one hour.
  5. Roll chilled dough into one inch balls and then into sprinkles – covering the entire outside of the dough.
  6. Place balls on a cookie sheet about 2 inches apart.
  7. Gently use your thumb to press down the center of the ball to make a small indentation.
  8. Place back into the refrigerator for about 15 minutes.
  9. Bake at 350* until set – about 12 minutes.
  10. After removing cookies from the oven, immediately place a Hershey Kiss in the center of each cookie.
  11. Remove to a cooling rack to cool. Enjoy!
Nutrition Information
Yield 12 Serving Size 1
Amount Per Serving Calories 261Total Fat 14gSaturated Fat 6gTrans Fat 0gUnsaturated Fat 7gCholesterol 37mgSodium 54mgCarbohydrates 33gFiber 1gSugar 21gProtein 2g

Did you make this recipe?

I would love to see! Tag me on Instagram @lynsey.kmetz or use the buttons below to share it on Pinterest! Thanks for your support!

© Moscato Mom
Cuisine: American / Category: Desserts

How Do You Say "I Love You" On Valentine's Day? 

My #Whole30 Birthday Cake

By Moscato Mom 19 Comments

Don't let your birthday derail your Whole30 success! This Whole30 Compliant Birthday Cake will be loved by everyone!

whole30 birthday cake

This post may contain affiliate links which means we receive a small commission at
no cost to you when you make a purchase. As an Amazon Associate, I may earn from
qualifying purchases. As an employee of Apogee, any affiliate links from our clients are at 0% commission and two-tiered referrals are at $0.

When I began my first #Whole30 back in July, I did not really put it together that my birthday would fall inside those 30 days. I know, I know - part of planning is looking at the entire time frame, but I was so focused on what I could and could not eat - I did not really look to see what other events might be going on during that time. But, because I had committed to myself (and of course all of you) for those 30 days, I knew I could not use the excuse of my birthday to break my commitment. Not to mention it was like Day 22, so I was feeling like a million bucks by then. I had the normal birthday shindig with friends and family here at the house, but everything was Whole30 style... even the #whole30 birthday cake.

Whole30 Inspired Birthday Cake

Items needed:

  • one seedless watermelon
  • favorite fruits such as cantaloupe, honey dew melon, pineapple, grapes, blueberries and strawberries
  • fruit baller
  • small cookie cutters
  • wooden skewers
  • very sharp knife

Begin with one seedless watermelon. Cut of both ends - as straight as possible. Then, stand on one side, and carefully cut the rind off lengthwise in small pieces, leaving a cylinder shape. This will be the base of your "cake." Using the fruit baller and cookie cutters, make shapes from firm fruits such as pineapple and cantaloupe. I let the girls help with this part.

how to make a fruit cake

Then begin "decorating" with your fruits using the wooden skewers to secure. Push the skewers all the way through the decorating "fruit" to secure. If you need to make it shorter, simply cut or break the skewer to your desired length.

whole30 birthday cake ideas

To be honest, I had no real idea of what design I was going to end up with - I just started sticking stuff places. Eventually I was happy with where everything was. The good news is on this fruit cake - if you do not like the design, you can easily just remove the fruit and start over! Try that on a "real" cake and you have a total disaster.

whole30 cakes

Everyone loved this "cake" and unlike when I have had normal baked birthday cakes in the past - there was not a single piece of fruit left over. In fact everyone there asked if I would make them a fruit cake for their birthday. I think that was the best gift I could have asked for.

fruit birthday cake
lynseysig

Trick or Treat Cake Pop Cupcakes from

By Moscato Mom 11 Comments

Back in July I had a blast making Fourth of July Surprise Cupcakes with Duncan Hines Summer Velvets cake mix. When I was given the opportunity to review their new Autumn Velvets, I wanted to make something similar... but with a twist. I have had a love for cake pops for years and thought how cool would it be to have a cupcake and a cake pop in one?! An idea - and a very tasty treat - was born. Check out my Halloween Trick or Treat Cake Pop Cupcakes.

halloween cupcakes

This post may contain affiliate links which means we receive a small commission at
no cost to you when you make a purchase. As an Amazon Associate, I may earn from
qualifying purchases. As an employee of Apogee, any affiliate links from our clients are at 0% commission and two-tiered referrals are at $0.

The Duncan Hines Autumn Velvets comes with two packets of cake mix - one brown and one orange. Their website has great ideas for how you can get creative with these velvets - making everything from swirl cakes to biscotti. But I kept thinking about biting in to a soft, rich cupcake... and finding an extra sweet "treat" inside. So I gathered up a couple of ingredients and got to work - not sure how, or even IF this would turn out.

duncan hines halloween cupcakes
...

Read On →

Shrimp Vegetti Alfredo Whole30

By Moscato Mom 14 Comments

A few weeks ago a friend of mine posted on Facebook that she "may never eat pasta again" after discovering the Vegetti. The Vegetti is a hand held vegetable spiralizer that lets you turn vegetables like squash, zucchini, and carrots into thin cut spiral "noodles." Oh, and it is less than 20 bucks!! I was a bit skeptical, but thought I would give it a shot. It has become one of my all time favorite kitchen gadgets.

vegetti spiralizer

This post may contain affiliate links which means we receive a small commission at
no cost to you when you make a purchase. As an Amazon Associate, I may earn from
qualifying purchases. As an employee of Apogee, any affiliate links from our clients are at 0% commission and two-tiered referrals are at $0.

Since starting Whole30 I have missed pasta so bad. Like really bad. Like had to talk myself out of cheating at least 3 times a week bad. So I was stoked to try the vegetti and see if I could have "pasta" again. I opted to go for alfredo (go big or go home, right?) using a Paleo Alfredo recipe made from cauliflower. In a word.... ahmayzing.

Shrimp Vegetti Alfredo Whole30

Shrimp Vegetti Alfredo Whole30

Prep Time: 10 minutes
Cook Time: 10 minutes
Total Time: 20 minutes

Shrimp Vegetti Alfredo is a super quick meal with tons of flavor.

Ingredients

  • 2 medium zucchini
  • 2 medium yellow squash
  • 1/2 pound shrimp, peeled and deveined
  • 3 tbsp olive oil
  • 4 cups cauliflower, chopped (1 head)
  • 1/2 cup chicken broth
  • 1 cup of coconut milk
  • 1/2 tsp salt
  • 2 tsp garlic powder
  • 1 tsp Season All Salt

Instructions

  1. First, you want to make your alfredo sauce. First, microwave your cauliflower in a microwave safe bowl with a bit of water until soft.
  2. Put cauliflower, chicken broth, coconut milk, salt, and garlic powder into your food processor and puree until thin.
  3. This will take a few minutes. In fact, I may have let it go too long because it was very very thin…
  4. Next, sauté your shrimp in olive oil and season all salt until done, and add to alfredo sauce.
  5. Transfer sauce and shrimp into a pan and warm on the stove to let the flavors mix together well.
  6. Finish by spiralizing your zucchini and yellow squash using your Vegetti. This takes just a few minutes and actually was fun. As I said, I was skeptical before, so I was pleasantly surprised when this worked as well as it did.
  7. Bring a pot of water to a boil and add your spiralized “noodles” for 2-3 minutes, until they are the softness that you want them. Be careful – overcooking makes them mushy. (I have since learned that you can also sauté the “noodles” in garlic and olive oil for even more flavor!)
Nutrition Information
Yield 4 Serving Size 1
Amount Per Serving Calories 355Total Fat 25gSaturated Fat 13gTrans Fat 0gUnsaturated Fat 10gCholesterol 120mgSodium 1500mgCarbohydrates 19gFiber 7gSugar 9gProtein 20g

Did you make this recipe?

I would love to see! Tag me on Instagram @lynsey.kmetz or use the buttons below to share it on Pinterest! Thanks for your support!

© Moscato Mom
Cuisine: American / Category: Main Dishes
shrimp
vegetti reviews

Drain your "noodles" well in a colander and serve like you would your favorite pasta alfredo dish!

whole30 alfredo recipe

Enjoy!

~Lynsey

#Whole30 Approved Baconnaise

By Moscato Mom 17 Comments

Since I began Whole30 - which has now become WholeLife - I have ventured in to learning how to cook new things. This is saying a lot for a gal who pretty much hates to cook. But it turns out that I am actually pretty good at it, and I have created some pretty amazing meals... so much so that Mike has agreed to do Whole30 in September - stating that the stuff I cooked that was Whole30 approved was "actually pretty good." Talk about a huge win.

One of the things I made that everyone has loved is Whole30 Compliant Mayo. Because I have pretty much survived on chicken salad, tuna salad and egg salad, making my own mayo was a must from early on. Since then I have been venturing in to flavored mayo to give things a bit of variety. By far my favorite concoction so far - is Baconnaise.

whole30 baconnaise

This post may contain affiliate links which means we receive a small commission at
no cost to you when you make a purchase. As an Amazon Associate, I may earn from
qualifying purchases. As an employee of Apogee, any affiliate links from our clients are at 0% commission and two-tiered referrals are at $0.

First thing you need for Baconnaise is Whole 30 Approved Bacon. Thankfully there are two different brands that make it - Applegate (which you may be able to find at your local store or can order from Amazon here) and U.S. Wellness Meats (which can be ordered online.)

Whole30 Baconnaise

Ingredients:

  • one egg
  • 1 teaspoon lemon juice
  • 1 teaspoon ground mustard
  • 1/2 pound Whole30 approved bacon
  • 1/2 cup light tasting oil

Begin by frying your bacon until crispy, rendering all of the grease and drippings into a measuring cup. You will need one cup of bacon grease - so I cooked a little over 1/2 of a pound of bacon.

You want to scrape all of the little crispies off the pan too - these will help the flavor be amazing. While bacon grease is cooling, put your egg, lemon juice, and ground mustard into your food processor.

Spin the blades just a few times - enough to break apart the yolk and kind of mix the ingredients. Then, let egg mixture sit for no less than 30 minutes. This part is really important. Something happens with the acid of the lemon juice and the egg that makes the magic of mayo happen.

If you try to mix too soon, the oil will not emulsify and you will have something the consistency of salad dressing.

After the bacon grease has cooled (but not solidified) and the egg mixture has sat for at least 30 minutes, turn your food processor on high speed and slowly drizzle the light tasting oil and bacon grease into the food processor.

You want to drizzle very very slowly - like the tiniest pour you can. This process takes about 5 minutes of consistent pouring while the blades spin.

You will see the mixture mixing together and it will look very thin until you have about 1/4 of a cup left - then you will see it start to thicken. Continue to slowly pour in grease and oil until finished.

Let food processor spin about another 30 seconds or so to emulsify the last few drops.

Using a spatula, gently scoop your mayo into air tight containers and refrigerate. Enjoy your Baconnaise in salads, on veggies, and my favorite - BLT lettuce wraps!

whole30 bacon mayo

Fourth of July Peeps S'mores Pops

By Moscato Mom 3 Comments

We are getting geared up for Fourth of July Celebrations here at the Moscato household. Hamburgers, hotdogs, and potato salad will be in abundance as well as desserts like my Fourth of July Surprise Cupcakes. The one thing we will not have though is a bonfire for roasting marshmallows for S'mores. Since we will have little ones in attendance and an all too nosey dog, we opted to just forego the bonfire. However... I gotta have S'mores!!  What's a Fourth of July Party without the ooey gooey goodness of marshmallows and chocolate between honey graham crackers?! Thankfully I discovered the new Patriotic Peeps at the grocery store - and an idea was born.

fourth of july peeps

This post may contain affiliate links which means we receive a small commission at
no cost to you when you make a purchase. As an Amazon Associate, I may earn from
qualifying purchases. As an employee of Apogee, any affiliate links from our clients are at 0% commission and two-tiered referrals are at $0.

...

Read On →

Fourth of July Surprise Cupcakes Duncan Hines Summer Velvets

By Moscato Mom 19 Comments

Surprise everyone with these Fourth of July Surprise Cupcakes - perfect backyard party food!

cupcakes

This post may contain affiliate links which means we receive a small commission at
no cost to you when you make a purchase. As an Amazon Associate, I may earn from
qualifying purchases. As an employee of Apogee, any affiliate links from our clients are at 0% commission and two-tiered referrals are at $0.

A few months ago I shared with you the new Duncan Hines Spring Velvets Collection making a beautiful layered cake that made me appear to be a much better baker than I actually am. Not only was the cake beautiful - but it was also delicious. So when I saw the new Duncan Hines Summer Velvet Collection at my local Winn Dixie, I had to get it and see what I could create.

Fourth of July Surprise Cupcakes

Ingredients:

  • Duncan Hines Summer Velvets kit
  • 4 eggs
  • 8 tbsp butter
  • 1 cup water
  • Star shaped cookie cutter - small
  • 9 inch round shallow baking pan
  • 6 cup muffin tin
  • White decorators icing
  • Sprinkles and toppers
4th of july cupcakes

Begin by mixing up the Blue Velvet package first using the directions on the box. Make sure that you tap out as many of the bubbles in the batter prior to baking. This will help your stars hold their form. Cook completely and let cool. Chill in the freezer for about one hour to help firm up cake for cutting. Firmly press the small cookie cutter into the cold cake to form stars.

fourth of july party

Place each star into your muffin tin facing the same direction. The star should take up most of the center of the tin - not touching any sides.

cupcakes 4th of july

Mix up the red packet of cake - using twice as much water as the recipe calls for. Because you will be piping the red batter in around the blue star, it needs to be a little thinner than your normal red velvet batter. Put the entire red batter into a piping bag or a gallon size ziplock and snip the corner - so that you can gently and slowly pour the red batter in and around the star. Cover the top of the star completely and bake according to package directions - approximately 35 minutes. Watch the baking to make sure the cupcakes do not overflow.

midge

Let cupcakes cool completely before decorating. What looks like normal delicious Red Velvet Cupcakes will now have a fun Fourth of July surprise with every bite!

fourth of july party ideas
4th of july party ideas

How are you celebrating the Fourth of July?

lynseysig

Miniature Monkey Bread Recipe

By Moscato Mom 17 Comments

I am not a huge fan of sweets. In fact weeks will go by and I realize the only "sweet" thing I have had is key lime Greek yogurt. But every once in a while I need something sweet and delicious and simple to make. Enter my current favorite - miniature monkey bread. This unbelievably simple recipe takes only 4 ingredients and 20 minutes to make. That is hard to beat.

miniature monkey bread recipe

This post may contain affiliate links which means we receive a small commission at
no cost to you when you make a purchase. As an Amazon Associate, I may earn from
qualifying purchases. As an employee of Apogee, any affiliate links from our clients are at 0% commission and two-tiered referrals are at $0.

Miniature Monkey Bread Recipe

Ingredients:

  • Pillsbury canned biscuits
  • 3 tbsp melted margarine
  • 1/2 c sugar
  • 1 tsp ground cinnamon

In a small bowl, mix cinnamon and sugar together. In a separate bowl, melt margarine until completely liquid. Using kitchen scissors, cut Pillsbury biscuits into small pieces.

miniature monkey bread 2

Then drop each piece in to melted butter and roll around in cinnamon sugar mixture. Then places pieces into a greased muffin tin about 3/4 full - giving some room for biscuits to rise.

monkey bread

Bake at 350* for about 15 minutes or until biscuits are completely cooked through. Serve warm.

miniature monkey bread recipe 2

We absolutely love these and love that we can make them on a whim with ingredients we almost always have on hand.

What is your favorite go to sweet snack?

lynseysig

Celebrate Spring with DuncanHines Spring Velvets

By Moscato Mom 11 Comments

Finally... finally Spring is here. After what feels like the longest Winter in history, we are finally getting a chance to get outside to do some gardening, spend days at the beach, and my favorite - enjoy our meals outside on the patio. This week I had the chance to test out Duncan Hines new Spring Velvets box cake mix and I thought what better way to kick off Springtime then to enjoy it on the patio with the whole family.

Since the 1940's the Duncan Hines brand has been bringing delicious cakes, cookies, brownies, and more to households around the country. They now have over 80 varieties of cakes, brownies, muffins, and cookies, as well as frostings and ready to bake brownies. Their newest collection - The Velvets - are available nationwide. The Velvets Collection includes their signature pink and blue velvets - perfect for birthday parties or Gender Reveal Parties - Spring Velvets and Summer velvets. The girls and I enjoyed mixing up the new Spring Velvets for our outside dinner party and not only was it delicious but it was so simple it looked like I actually knew what I was doing 😉

duncan hines spring velvets

The Duncan Hines Spring Velvets comes with both pink and yellow velvet cake mix. In just a few minutes we whipped up each bath and put them in round bakers in the oven. After baking we set aside and let cool completely, and then sliced off the top and layered with Duncan Hines Creamy Cream Cheese Frosting.

duncan hines spring velvets 1

...

Read On →

Healthier Chicken Parmesan

By Moscato Mom 1 Comment

Last week I was approached by Tuttorosso Tomatoes to talk about their newest promotion - #CelebrateYourTradition - where you can enter to win a prize package of $550 just for sharing one of your family's favorite traditions and who inspired it! Since I have already shared my Dad's Simple Spaghetti Recipe (in which I also use Tuttorosso Tomatoes) I decided to make one of Mike's favorites - Chicken Parmesan.

And since we are both wanting to eat healthier I made just a few small adjustments to bring down the calories, without giving up any of the flavor. What we ended up with was something all four of us agreed was the best meal to come out of my kitchen.

chicken parm recipe
chicken parmesan 1
homemade chicken parmesan 2
homemade chicken parmesan 1

This meal was loved so much I know it is going to be a new "tradition" that we will do around here often. And since it is healthier than restaurant style chicken parmesan - we can feel better about making it from home.

I can also attest to the fact that it is even better the next day - as I am sitting here having the leftovers for lunch! And according to my calculations in MyFitnessPal, each serving is less than 320 calories. Talk about Guilt Free Deliciousness!

Healthier Chicken Parmesan – Tuttorosso Tomatoes

Healthier Chicken Parmesan – Tuttorosso Tomatoes

Yield: 4
Prep Time: 20 minutes
Cook Time: 30 minutes
Total Time: 50 minutes

Save on carbs and calories without losing flavor with this Healthier Chicken Parmesan.

Ingredients

  • 4 boneless skinless chicken breasts
  • 1 tsp dried Italian seasoning
  • 1/2 c flour
  • 1/2 tsp salt
  • 1/2 tsp pepper
  • 3 egg whites
  • 1/2 c water
  • 2 cups Rice Chex cereal, , crushed
  • 2 tablespoons grated parmesan cheese
  • 4 tbsp olive oil
  • 1 can Tuttorosso No Salt Added Crushed Tomatoes
  • 1 c shredded low fat mozzarella cheese
  • whole wheat pasta

Instructions

  1. Preheat oven to 425*. In one bowl lightly beat egg whites and water together.
  2. In another bowl put flour, salt, and pepper.
  3. In another bowl, mix crushed Rice Chex with Italian seasoning.
  4. Working with one chicken breast at a time, first coat with flour, then dredge through egg white mixture and then place into the cereal mix and press until well coated on both sides.
  5. Put Olive oil into a large skillet and heat over medium heat.
  6. Place pieces of coated chicken into skillet and cook until chicken is just cooked through – about 3 minutes on each side.
  7. Then transfer chicken to a 9 x 13 baking dish and top each piece evenly with crushed tomatoes and mozzarella cheese.
  8. Bake until the cheese is melted and lightly browned and chicken is completely cooked – about 20-25 minutes.
  9. Serve over whole wheat pasta.
Nutrition Information
Yield 4 Serving Size 1
Amount Per Serving Calories 633Total Fat 24gSaturated Fat 6gTrans Fat 0gUnsaturated Fat 16gCholesterol 118mgSodium 770mgCarbohydrates 51gFiber 6gSugar 11gProtein 54g

Did you make this recipe?

I would love to see! Tag me on Instagram @lynsey.kmetz or use the buttons below to share it on Pinterest! Thanks for your support!

© Moscato Mom
Cuisine: American / Category: Main Dishes
tuttorosso

Head over to the Tuttorosso Facebook Page to share your favorite family tradition and enter to win a prize pack worth over $550!

Mango Chicken Quesadillas - Cinco de Mayo

By Moscato Mom Leave a Comment

In just a few weeks we will be celebrating Cinco de Mayo - one of my favorite holidays. Mike's Mom is Mexican and has taught me how to cook some of THE most amazing dishes. Seriously I could eat Mexican food all day every day. One of the highlights of my trip to Cozumel was all of the Mexican food! Today this recipe landed in my inbox and I can not wait to try it. Everything about it - including it being healthy - sounds like something I could just devour. Plus I love any recipe that doesn't require a ton of cooking - hey, quick and easy is how I do food around here.

Cinco de Mayo commemorates the Mexican army’s victory over France at the Battle of Puebla during the Franco-Mexican War, and has evolved into a celebration of Mexican culture and heritage. Celebrations in the United States often extend beyond the actual day to encompass an entire week, with parades, festivals and fiestas that include music, dancing, and food. A dish like Mango Chicken Quesadillas takes the very traditional Mexican dish but combines shredded chicken with brown mustard, honey and Tabasco creating a flavorful filling and adding mango for a sweet twist. By preparing the meal on the IMUSA Cast Aluminum Comal the food is made healthier and the non-stick surface leaves clean up a breeze. Bringing a vigorous, home-style aroma to the party, this traditional Mexican dish will smells as delicious as it tastes.

mango chicken quesadillas

...

Read On →

Valentine's Day Strawberry Puppy Chow

By Moscato Mom 21 Comments

When I made Funfetti Chex Buddies Candy last year, it was all I could do to keep from eating the entire batch in one sitting.  It was absolutely delicious. This year I wanted to make the same thing, but pink for Valentine's Day.  I swapped out a few ingredients and voila!  Another family favorite!

Valentine’s Day Strawberry Puppy Chow

Valentine’s Day Strawberry Puppy Chow

Yield: 12
Prep Time: 10 minutes
Additional Time: 10 minutes
Total Time: 20 minutes

Celebrate Valentine's Day with this sweet treat! A twist on traditional Puppy Chow, this Strawberry Puppy Chow will be loved by everyone!

Ingredients

  • 6 oz white chocolate or white vanilla candy melts
  • 5 cups rice chex cereal
  • 1 cup strawberry cake mix
  • 1 cup powdered sugar
  • Valentine’s themed M&Ms

Instructions

  1. Put rice chex cereal into a large sized bowl.
  2. In a separate bowl, mix together strawberry cake mix and powdered sugar.
  3. Slowly melt white chocolate in the microwave, stopping it every 30 seconds or so to make sure it doesn’t burn.
  4. Add melted white chocolate to chex cereal and lightly stir to coat evenly. Be careful to not break the chex cereal too much.
  5. Add the cake mix & powdered sugar to the white chocolate covered chex cereal and lightly stir to coat evenly. You could add the chex cereal and powdered sugar mixture to a ziplock bag, then shake to coat as well, but I find the bowl is easier.
  6. Allow to dry completely and then add M&Ms.
  7. Enjoy!
Nutrition Information
Yield 12 Serving Size 1
Amount Per Serving Calories 239Total Fat 8gSaturated Fat 5gTrans Fat 0gUnsaturated Fat 3gCholesterol 14mgSodium 142mgCarbohydrates 40gFiber 0gSugar 28gProtein 3g

Did you make this recipe?

I would love to see! Tag me on Instagram @lynsey.kmetz or use the buttons below to share it on Pinterest! Thanks for your support!

© Moscato Mom
Cuisine: American / Category: Desserts

Chewy Strawberry M&M Valentine's Cake Cookies

By Moscato Mom 8 Comments

Last year I made some of the most amazing Chewy M&M Cookies ever. They were such a hit that Mike and the girls asked me to make them again for Valentine's Day.  I wanted to surprise them with something different so I made these Chewy Strawberry M&M Valentine's Cake Cookies... now it is a toss up to decide which one we like best.

chewy m&m cookies

This post may contain affiliate links which means we receive a small commission at
no cost to you when you make a purchase. As an Amazon Associate, I may earn from
qualifying purchases. As an employee of Apogee, any affiliate links from our clients are at 0% commission and two-tiered referrals are at $0.

Chewy Strawberry M&M Valentine's Cake Cookies

Ingredients:

  • 1 stick of melted butter
  • 1 egg
  • 1 tsp vanilla
  • 4 ounces cream cheese, softened
  • 1 c M&Ms
  • 1 c white chocolate chips
  • 1 box strawberry cake mix

Directions:

In a mixer, combine butter, egg, vanilla and cream cheese and mix on low until mixed thoroughly. Slowly add in dry cake mix until well combined.  Remove from mixer and gently stir in M&Ms and white chocolate ships by hand. Cover and refrigerate dough until firm, at least one hour. Roll dough into one inch balls and place on a greased cookie sheet.  Bake at 350* for 10-12 minutes - you do not want the cookies to brown.  Cookies will still be soft to the touch.  Let cookies cool on cookie sheet for a few minutes, then remove to a wire rack to finish cooling.

chewy m&m cookies

Turkey and Sun-Dried Tomato Pinwheel Wraps

By Moscato Mom 7 Comments

Meat and cheese wrapped in a tortilla is hardly a new idea, but slice the same wrap into spirals or “pinwheels” and you have a fun party appetizer. These fun-sized pinwheels are great for school lunches or after school snacks on the go. Fill them with your child’s favorite meats, cheeses, and vegetables!
turkey tomato pinwheel wraps

This post may contain affiliate links which means we receive a small commission at
no cost to you when you make a purchase. As an Amazon Associate, I may earn from
qualifying purchases. As an employee of Apogee, any affiliate links from our clients are at 0% commission and two-tiered referrals are at $0.

 
Ingredients:
2 tablespoons mayonnaise
4 slices turkey
4 slices provolone cheese
shredded iceberg lettuce as needed
8 sun-dried tomatoes
4 tortilla wraps
 
Instructions:
Lay out the tortilla wraps.
Spread a light layer of mayonnaise over half of each wrap.
Lay out the turkey on top of the mayonnaise, then place a slice of cheese on top of the turkey.
Lay a few sun-dried tomatoes on top of the cheese, then top with iceberg lettuce.
Roll the tortilla wraps around the fillings, and insert toothpicks into each to hold it in place. Make perpendicular cuts into the wrap, creating the pinwheels. Use caution when serving, or remove the toothpicks before serving.
 
turkey pinwheel wraps
lynseysig

Simple Thai Lettuce Wraps

By Moscato Mom 5 Comments

These Keto Thai Lettuce Wraps are a dairy-free keto meal that everyone will love! Simple ingredients, tons of flavor and perfect for feeding a crowd or for weekly meal prep!

thai lettuce wraps

This post may contain affiliate links which means we receive a small commission at
no cost to you when you make a purchase. As an Amazon Associate, I may earn from
qualifying purchases. As an employee of Apogee, any affiliate links from our clients are at 0% commission and two-tiered referrals are at $0.

Last week my personal trainer and I were discussing nutrition and I asked for a couple ideas of healthy meals to make that were "out of the norm" of my usual chicken and broccoli routine.  

As much as I love chicken and broccoli - varying the flavors with the different seasonings - it has gotten... well...boring. One of the recipes he suggested was Thai Ground Beef from the Gourmet Nutrition Cookbook.  I had actually never tried Thai food but the recipe looked easy enough, so I gave it a shot.  

Looking For More Keto Recipes? Check out my entire Library Here.

I knew I wanted to blog it if it was good... but we ended up eating the entire first batch so I had to make it a second time just to take pictures.  It was ok, though, because we all loved it that much.  

I ended up adding in some red cabbage and putting the Thai Ground Beef Filling into lettuce wraps to make the meal feel "complete."

thai lettuce wraps

I used the Fresh Market Thai Peanut Sauce which is naturally gluten-free and has terrific flavor without being overpowering.

You can also make this recipe with ground turkey or even ground chicken for delicious Thai Chicken Lettuce Wraps. It is so versatile it has been our family favorite for a long time.

Thai Beef Lettuce Wraps

My favorite part about this easy Thai Lettuce Wraps Recipe is how well it reheats. This is one of those recipes that gets better and better as the flavors combine.

To reheat just simply put the desired amount of filling into a microwave safe bowl, covered with a dampened paper towel, and heat in :30 intervals stirring in between until you reach your desired temperature.

Then spoon into your favorite lettuce leaves or just eat with a fork! So delicious and so good for you!

Thai Lettuce Wraps

Ingredients

  • 1 pound ground beef
  • 3 cups cabbage shredded
  • 2 cups red cabbage shredded
  • 1 cup shredded carrots
  • 1 medium bell pepper, chopped
  • 1/2 cup peanut sauce
  • lettuce of choice

Directions

Begin by browning ground meat completely until all pink is gone in a large, deep skillet.

Add in cabbages, carrots, and bell pepper and cook down, stirring often until onion is translucent and cabbages are softened.

Pour in peanut sauce and toss to coat well.

Spoon into your choice of lettuce.

Thai Beef Lettuce Wraps

Thai Beef Lettuce Wraps

Prep Time: 10 minutes
Cook Time: 30 minutes
Total Time: 40 minutes

These Keto Thai Lettuce Wraps are a dairy-free keto meal that everyone will love! Simple ingredients, tons of flavor and perfect for feeding a crowd or for weekly meal prep!

Ingredients

  • 1 pound ground beef
  • 3 cups cabbage shredded
  • 2 cups red cabbage shredded
  • 1 cup shredded carrots
  • 1 medium bell pepper, chopped
  • 1/2 cup peanut sauce
  • lettuce of choice

Instructions

  1. Begin by browning ground meat completely until all pink is gone in a large, deep skillet.
  2. Add in cabbages, carrots, and bell pepper and cook down, stirring often until onion is translucent and cabbages are softened.
  3. Pour in peanut sauce and toss to coat well.
  4. Spoon into your choice of lettuce.
Nutrition Information
Yield 12 Serving Size 1
Amount Per Serving Calories 159Total Fat 9gSaturated Fat 3gTrans Fat 0gUnsaturated Fat 5gCholesterol 34mgSodium 212mgCarbohydrates 9gFiber 2gSugar 5gProtein 12g

Did you make this recipe?

I would love to see! Tag me on Instagram @lynsey.kmetz or use the buttons below to share it on Pinterest! Thanks for your support!

© Moscato Mom
Category: Easy Recipes

California Medley Casserole

By Moscato Mom 6 Comments

Every couple of months I have had the chance to share with you some fun new recipes as part of the Country Crock Casserole Club. For as long as I can remember, Country Crock has adorned our family's dinner table and it has been fun to literally make up recipes which have all become staples in our meal plan.  This month's casserole was no different - taking a few basic ingredients and creating a side dish that I have literally made three times since.

california medley casserole #countrycrockcasseroles

This post may contain affiliate links which means we receive a small commission at
no cost to you when you make a purchase. As an Amazon Associate, I may earn from
qualifying purchases. As an employee of Apogee, any affiliate links from our clients are at 0% commission and two-tiered referrals are at $0.

The inspiration for the California Medley Casserole began with the Thanksgiving Family Fave Veggie Casserole from the Country Crock website.  I wanted to make it as low calorie as possible so I tweaked a few things, including using Country Crock Light, leaving out the cheese, and throwing in some whole wheat pasta.  The result is a delicious, flavorful dish that my whole family enjoyed. This is a great dish for holidays as well as potluck meals because it is simple and inexpensive to make - even enough for a crowd.  Try it out - I hope you love it as much as we do.

California Medley Casserole

California Medley Casserole

Prep Time: 15 minutes
Cook Time: 25 minutes
Total Time: 40 minutes

This California Medley Casserole is a filling meal the whole family will love.

Ingredients

  • 1/2 c Country Crock Light Spread, divided
  • 2 tsp garlic salt, divided
  • 1 package, (approx 8 cups) California Vegetable Medley, thawed
  • 1 medium onion, diced
  • 1 cup Panko bread crumbs
  • 2 cups whole wheat rotini pasta, cooked
  • 1/2 c grated parmesan cheese

Instructions

  1. Preheat oven to 375°. Melt 1/4 cup Country Crock Light® Spread over medium-high heat in large nonstick skillet and cook onion and one tsp garlic salt, stirring occasionally, until golden brown, about 8 minutes. Stir in bread crumbs and cook, stirring occasionally, until lightly toasted, about 2 minutes; remove to bowl.
  2. Melt remaining 1/4 cup Spread in same skillet and add vegetables, cooked pasta, and remaining garlic salt; toss to coat. Pour 1/2 into shallow 2-qt. baking dish. Sprinkle with 1/2 of the Parmesan cheese and 1/2 of the crumb mixture. Repeat with remaining ingredients.
  3. Bake until heated through, about 25 minutes.
Nutrition Information
Yield 6 Serving Size 1
Amount Per Serving Calories 411Total Fat 21gSaturated Fat 8gTrans Fat 1gUnsaturated Fat 11gCholesterol 27mgSodium 1234mgCarbohydrates 47gFiber 9gSugar 7gProtein 12g

Did you make this recipe?

I would love to see! Tag me on Instagram @lynsey.kmetz or use the buttons below to share it on Pinterest! Thanks for your support!

© Moscato Mom
Cuisine: American / Category: Side Dishes
easy california casserole

Primary Sidebar

  • Facebook
  • Instagram
  • LinkedIn
  • Pinterest
  • Twitter

Grab My Free Cookbook

Grab my free Six Ingredients Or Less Keto Recipes eBook and receive new recipes in your inbox every week!

Thank you!

You have successfully joined our subscriber list.

.

Copyright © 2021 Moscato Mom • All Rights Reserved • Site Powered by The One Stop Blog Shop

rokettube mobil porno mobil porno porno izle porno izle